Creating unique DIY earrings is a rewarding hobby that allows individuals to express their creativity while producing wearable art. With just a few basic materials and simple techniques, anyone can craft beautiful earrings tailored to their personal style. This beginner’s guide will break down the essential steps and tools needed to embark on this fun project.
From selecting the right materials to mastering basic assembly techniques, each aspect of earring creation will be covered. Whether it’s using beads, wire, or charms, the possibilities are endless. This guide serves as an accessible starting point for those looking to explore the world of DIY earrings.
As they delve into this creative journey, hobbyists will discover the satisfaction of making something special with their own hands. Armed with knowledge and inspiration, they are ready to begin crafting earrings that not only enhance their wardrobe but also showcase their individuality.
Essential Tools and Materials for DIY Earrings
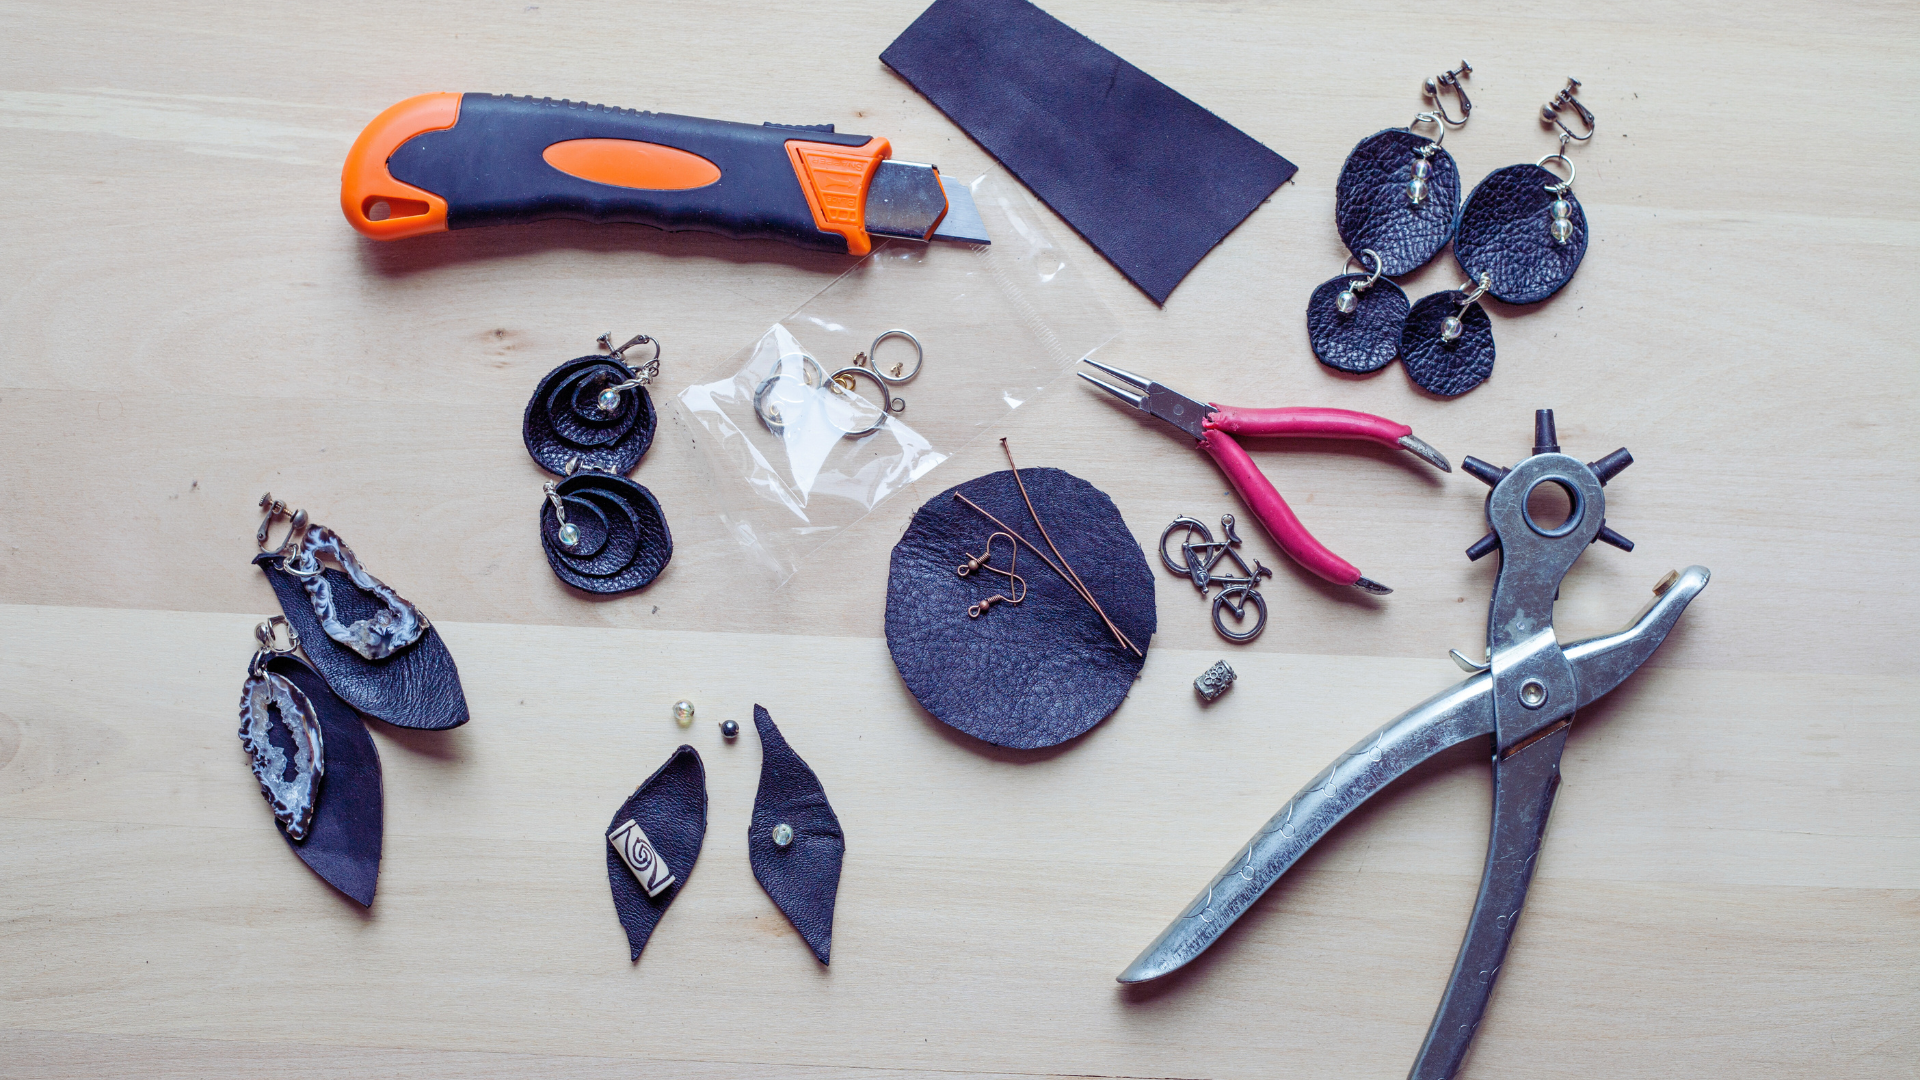
Creating DIY earrings requires a selection of essential tools and materials. This section discusses the necessary equipment and components to successfully craft earrings, focusing on tools and materials that ensure quality and durability.
Choosing the Right Tools: Pliers, Wire Cutters, and More
The primary tools for DIY earrings include various pliers and wire cutters. Commonly used pliers are round-nose pliers, which help in creating loops and curves, and flat-nose pliers, useful for gripping and holding components firmly. Chain-nose pliers work well for opening jump rings without damaging them.
Wire cutters are essential for trimming jewelry wire or cutting headpins. A good pair of flush cutters ensures a clean edge, which is important for a polished look. Investing in a tool kit with these basics often makes the crafting process smoother and more enjoyable.
Selecting Beads, Wires, and Findings
Choosing the right beads is crucial for the design. Various types of beads can be used, including glass beads, seed beads, and wooden beads. Each type offers different aesthetics; glass beads tend to have more visual depth, while seed beads can add intricate details.
The wire used can vary in thickness and material. Jewelry wire is commonly used, and it often comes in different gauges. Thicker wire provides strength, while thinner wire allows for more flexibility. Selecting appropriate earring findings, such as jump rings and head pins, is essential to hold everything together securely.
Understanding Earring Hooks and Ear Wires
Earring hooks and ear wires are critical components for ensuring comfort and security when wearing earrings. Earring hooks are available in various styles, including French hooks and lever backs, each offering a different level of security.
Materials for ear wires typically include sterling silver, gold-filled, or stainless steel. Each material has its benefits in terms of hypoallergenic properties and durability. When creating earrings, it’s advisable to choose materials that complement the beads and overall design. This approach enhances both aesthetics and wearability.
Getting Started: Simple DIY Earring Styles
Creating earrings at home can be a fun and rewarding experience. This guide will explore different styles, emphasizing straightforward methods for making stud, dangle, and hoop earrings.
Making Stud Earrings
Stud earrings are among the simplest designs to craft. Basic materials include earring posts, backing, and decorative elements such as beads or gemstones.
Materials Needed:
- Earring posts
- Earring backs
- Glue or pliers
- Decorative beads or charms
- Select a bead or charm for the design.
- Apply a small amount of glue to the post’s end and attach the chosen item.
- Allow the glue to dry completely before attaching the backing.
Stud earrings are versatile and can complement any outfit easily.
Creating Dangle Earrings
Dangle earrings add movement and flair. They typically hang below the earlobe and can incorporate various components.
Materials Needed:
- Earring hooks
- Jump rings
- Beads or charms of choice
- Choose decorative elements to hang from the hook.
- Use jump rings to attach beads to the hook securely.
- Ensure all connections are tight to avoid losing pieces.
Dangle styles can range from elegant to casual, making them suitable for any occasion.
Designing Easy Hoop Earrings
Hoop earrings provide a classic look and can be personalized easily.
Materials Needed:
- Hoop wire or pre-made hoop frames
- Beads or tassels
- Wire cutters
- Cut a length of hoop wire, if necessary.
- Thread beads or tassels onto the wire to design the look.
- Shape the wire into a circle and twist to secure.
Simple hoop earrings can be a great addition to any jewelry collection and offer endless possibilities for customization.
Fundamental Techniques for Jewelry Making
Creating DIY earrings involves mastering a few essential techniques that lay the foundation for beautiful craftsmanship. Understanding basic assembly, wire wrapping, and how to use jump rings and head pins is crucial for beginners in jewelry making.
Basic Earring Assembly Steps
Earring assembly starts with selecting the components, including earring hooks, beads, and any decorative elements.
- Gather Materials: Tools needed include earring hooks, head pins, beads, and round nose pliers.
- Prepare the Head Pins: Cut the head pins to the desired length. For each bead, leave about 1 inch of wire above the bead.
- String the Beads: Slide the selected beads onto the head pin. Multiple beads can be layered for more intricate designs.
- Create a Loop: Using the round-nose pliers, create a loop above the beads by bending the wire at a 90-degree angle and then wrapping it around to secure the beads.
- Attach to Earring Hooks: Finally, open the earring hook and attach the loop from the head pin before closing it securely.
Wire Wrapping for Beginners
Wire wrapping is a technique used to create secure connections and decorative elements in jewelry. It allows for creativity and customization.
- Choose the Right Wire: Use jewelry wire, typically 20-24 gauge, which is flexible yet sturdy enough for earrings.
- Create a Loop: Begin by making a small loop at the end of the wire. This will anchor the beads.
- Wrap the Wire: After threading beads onto the wire, use round-nose pliers to form a loop at the top.
- Secure the Beads: Wind the wire around the base several times to create a secure hold on the beads.
- Finish with a Loop: End with a loop to attach to earring findings. Ensure the wire is secure but not overly tight to maintain flexibility.
Attaching Jump Rings and Head Pins
Jump rings and head pins serve as connectors in earring designs. Mastery of these elements enhances earring stability.
- Open the Jump Ring: Use pliers to gently twist the jump ring open without deforming it.
- Attach Elements: Slide in the desired components, such as the finished head pin or additional charms, through the jump ring.
- Close the Jump Ring: Twist the jump ring back into its original shape to secure everything in place.
- Use Head Pins Effectively: Head pins are best for beads, as they help form individual bead segments in a design.
Understanding these fundamental techniques enables beginners to create unique and attractive DIY earrings with confidence.
Inspiring Your Unique Earring Designs
Creating unique earrings starts with understanding how to customize materials and colors according to personal style. Personal touches can elevate simple designs into cherished gifts or memorable pieces for special occasions.
Customizing with Materials and Colors
A variety of materials can be used to create unique earrings. Common options include beads, metals, fabric, and natural elements like wood or stones. Each material can bring out different aesthetics and emotions.
When selecting colors, consider the following:
- Complementary Colors: Choose colors that enhance each other.
- Seasonal Palettes: Base colors on seasonal trends for relevance.
- Personal Preference: Let individual tastes guide the choice.
Combining various materials and colors can lead to distinct earring designs. For instance, pairing wooden elements with vibrant beads can create a striking contrast.
Personalizing for Gifts and Special Occasions
Personalized earrings make memorable gifts. She can incorporate initials, birthstones, or charms that are meaningful to the recipient. Tailoring designs to the preferences of the receiver adds a thoughtful touch.
For special occasions like birthdays or anniversaries, consider themes. For example, floral designs can suit spring events, while metallic tones may fit formal gatherings.
Plan designs around the recipient’s wardrobe. Matching or contrasting with their style will ensure that the earrings will be worn and appreciated. The thoughtfulness behind personalized designs resonates, making them cherished keepsakes.
Leave a Reply